

November 29, 2021
Quick Guide to Referencing
I’ve learned that writing papers is a lot easier and less stressful when using the right format and a consistent way of referencing from the start. This way you don’t struggle at the end to add all the citations correctly. I use the Microsoft Word Referencing tool which is easy to master and doesn’t require you to download any additional apps or add-ons. Here I’ll give you a quick introduction in how to use it.
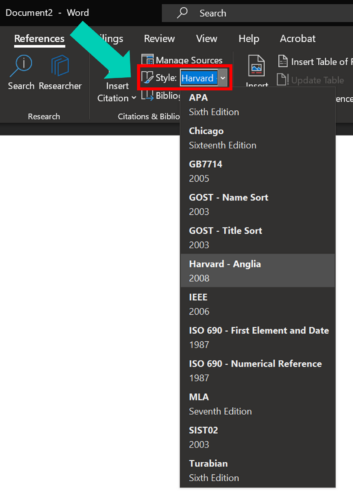
First off you want to establish which referencing style you would like to use in the document. Some professors will give you a specific one to use, others don’t mind which one as long as you are consistent in your citing and referencing. Check this before you get started. I have chosen to use Harvard. In order to establish this, go to the ‘References’ tab. Click on the small arrow to open the drop down menu and see all the available styles. Once you have chosen one it will be saved as the default for all new documents you create.
Add a new source
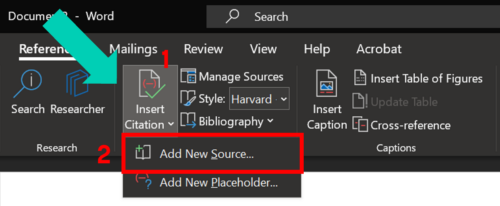 Add new source by opening the drop down menu on ‘Insert Citation’ (1) and then selecting ‘Add New Source’ (2).
This will then open a new window ‘Create Source’. Here the first thing you want to do is select the corresponding type of source (3). Depending on the type the programme will ask for different information. All you have to do is enter it accordingly.
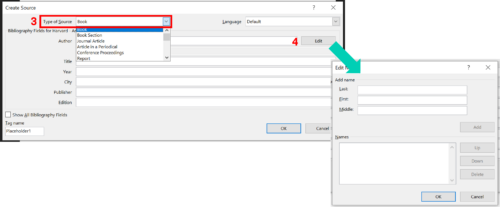 I‘d recommend using the edit field (4) to add authors. It makes easier to enter the information in the new window that opens – it’s especially useful when there are multiple authors. The same goes for editors when you are entering a book as a source. Also, make sure you select the right language in the upper right corner if your default language isn’t the one you’re writing in.
Insert citation
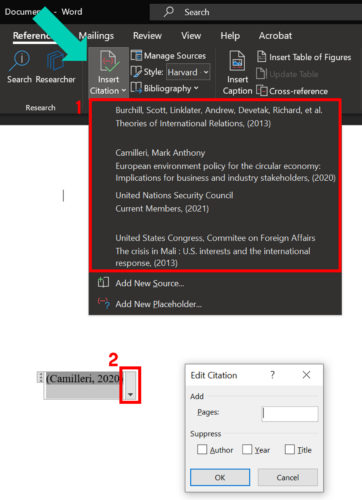 Once you have added a source it will be displayed in the drop down menu when you select ‘Insert Citation‘ again. That is called the ‘list of current sources‘.
Select the source you want to cite from the list (1) and the citation according to your selected referencing style will be inserted where your courser is located. In this case it‘s ‘(Camilleri, 2020)‘.
By using the right click or clicking the arrow next to your citation (2) you can edit it. You can add a page number or exclude certain information that is not needed in that case.
Manage all sources
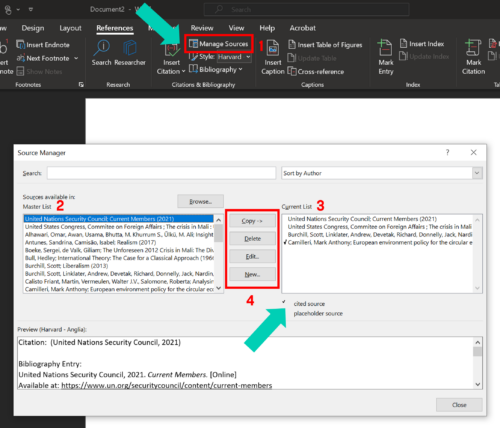 If you find that you have made a mistake on one of your sources, you can always edit it. It‘s easiest done by selecting ‚Manage sources‘ (1). The window that opens allows you to manage all sources.
On the left (2) your Master List is displayed. These are all sources you have ever created in any Word document. On the other side (3) your Current List is shown. These are the sources you have in the document itself. Here you can also see which of the sources you have already cited. The cited sources have tick next to them.
Sources from both lists can be edited or new sources can also be added in this window (4). If you want to add an already existing source to your current document select it in the Mater List and click ‘Copy‘ (4). The source will then appear in the Current List.
Bibliography
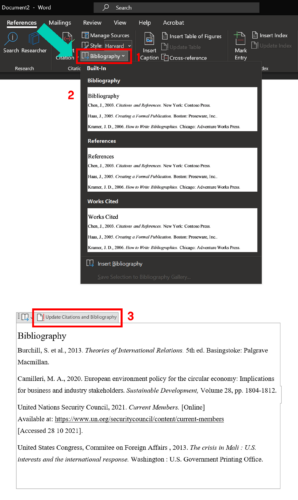 Once you‘ve finished your paper you can easily add the bibliography at the end. Just select ‘Bibliography‘ (1) and choose the style you want from the drop down menu (2). Word will then insert the bibliography according to the referencing style you chose at the beginning.
If you add new sources or edit sources after inserting the bibliography don‘t forget to update it. Just click ‘Update Citations and Bibliography‘ at the top of your list (3). Everything will automatically be updated accordingly.
The referencing tab in Word offers many more options like inserting a table of contents or what is also every useful when you use graphs/pictures is the caption tool. You’ll need some time to get to know it all, but it is definitely worth it.
I hope this helps you in getting started on your papers. If you have any questions don’t hesitate to ask and I’ll see if I can help you out.
All the best,
Emily